


HOW TO PERM HAIR AT HOME TUTORIAL
- patricia
- Jan 30
- 15 min read
Updated: Oct 9

How to Perm Your Natural Hair At Home The Ultimate Guide to Gorgeous Curls Diy Tutorial With Instructions On How To Give Yourself A Perm Is Home Perming Safe ? Yes It Is
Perming your hair is a classic way to add volume, texture, and those beautiful, bouncy curls that are all the rage. Whether you want to add body to straight hair or enhance your natural waves, a perm can transform your look and give your hair a fresh, fun vibe. In this ultimate tutorial we’ll walk you through the steps of how to perm your natural hair at home, introduce some top brands you can use, and highlight some famous celebrities who have rocked perms throughout the years. i have included all the links to the products .We will now look at types of perm as techniques will need be adjusted i will list few of the perms ,short perm ,curly perm, spiral perm ,body wave perm ,korean perm,japanese perm, digital perm, perms for men, beach wave perm ,loose wave perm ,root perm,and the 90s perm hairstyles as you can see there is a lot variants so my advice is to go to a perm specialist who only does perms and who will understand these different perms .a skilled hair stylist for perms needs years off experience just to know all the terms names for the different perm cuts , pay cheap pay twice go for the best salon you can afford .


How Perms Work Our Diy Tutorial And Instructions
A perm (short for permanent wave) is a chemical treatment that changes the natural texture of hair, making it curly or wavy for an extended period. The process involves chemically breaking and reforming the protein bonds (disulfide bonds) in the hair to create a new, long-lasting shape.
Step-by-Step Process How To Give Yourself A Perm At Home
The perm process consists of several steps to ensure the curls or waves set properly and last for weeks or months. i have included af links to check latest prices on amazon.com
1. Hair Preparation instructions
The stylist assesses the hair’s health, texture, and previous chemical treatments (such as color or relaxers). Over-processed or severely damaged hair may not be suitable for a perm.
The hair is washed with a clarifying shampoo to remove any buildup, oils, or residue that could interfere with the chemicals and give a bad perm that does not last.
Hair is sectioned into smaller parts for even application.
It is then wrapped around perm rods, affiliate link https://amzn.to/44k81qM which determine the size and shape of the curls. The rod size matters:
Small rods create tight curls.
Medium rods produce bouncy, defined curls.
Large rods result in loose waves or body waves how long leave perm rods in ? For a perm rod set, you can leave the rods in for five hours to overnight for a stronger perm depending on the desired curl tightness and how long you want the style to last. Generally, leaving them in for 8-10 hours is recommended for a tight curl pattern, while shorter times can create looser waves.
2. Application of Perm Solution at home olaplex no3 https://amzn.to/45msCMl amazon af link

The perm solution (also called a waving lotion) is applied to the wrapped hair.
The solution breaks down the disulfide bonds in the hair’s keratin structure, making the hair pliable so it can take on the new shape of the rods.
Different types of perm solutions are used depending on hair type:
Alkaline (cold) perms – Contain ammonium thioglycolate and work best for thick, resistant hair. No heat is needed.
Acid perms – Contain glyceryl monothioglycolate and are gentler, requiring heat to process. Best for fragile or fine hair.
3. Processing Time for natural hair permed at home
The perm solution is left on the hair for about 10 to 30 minutes, depending on:
Hair type (thicker hair takes longer).
The desired tightness of the curl (tighter curls need more time).
The strength of the perm solution.
The stylist checks the curls frequently to avoid over-processing, which can lead to excessive dryness or breakage.
4. Rinsing and Neutralizing Your Hair

Once the curls have formed properly, the perm solution is rinsed out thoroughly with warm water.
A neutralizer (commonly hydrogen peroxide or sodium bromate) is applied. This is crucial because:
It rebuilds the disulfide bonds, locking the hair into the new curly shape.
It stops the chemical process to prevent over-processing.
The neutralizer is left on for 5–10 minutes, then rinsed out completely.
5. Final Rinse, Rod Removal, and Styling

The rods are gently removed, revealing the new curls.
The hair is rinsed again to ensure no chemicals remain.
Styling products (such as curl creams or mousse) may be applied to enhance and protect the curls.
The hair is air-dried or diffused on a low heat setting. how to fix a bad perm ?A bad perm is difficult to fix immediately, as it involves chemical changes to the hair. The best course of action is to wait for the hair to grow out and be stronger before trying again.
Types of Perms in This Diy Home Tutorial
There are various types of perms you can do at home diy each creating different curl patterns and textures. The best one for you depends on your hair type, desired style, and maintenance level.
1. Cold Perm (Alkaline Perm)
Uses strong alkaline chemicals (ammonium thioglycolate).
Does not require heat to process.
Creates tighter, more defined curls with longer-lasting results.
Best for thick, coarse, or resistant hair.
Drawback: Can be drying or damaging to fine or fragile hair.
2. Digital Perm (Hot Perm)
Uses a milder chemical solution combined with heat.
Heated rods are used to shape the curls, giving softer, more natural-looking waves.
Works best on medium to long hair.
Drawback: More expensive and requires a longer processing time (can take 3+ hours).
3. Body Wave Perm
Uses large perm rods to create loose, natural-looking waves.
Adds volume and texture rather than tight curls.
Great for fine or limp hair to give it more movement.
Drawback: Curls are not as long-lasting as other perms.
4. Spiral Perm
Uses long, thin rods to create tight, corkscrew curls.
Curls are more defined and bouncy.
Best for long hair to achieve a dramatic look.
Drawback: Requires more maintenance and styling.
5. Beach Wave Perm
Designed to mimic naturally tousled, wavy hair.
Uses large rods and a gentler solution.
Perfect for a relaxed, effortless look.
Drawback: Looser waves mean the perm may not last as long as traditional perms.
6. Root Perm
Focuses on adding curl or volume only at the roots.
Ideal for people with flat or fine hair looking for a lift.
Drawback: Doesn’t add curls to the entire hair length.
Perm Aftercare: How to Maintain a Diy Perm Instructions

Proper care is essential to keep curls looking fresh, healthy, and long-lasting.
1. First 48 Hours: Crucial Period For Perm After Care
Do not wash your hair for at least 48 hours after getting a perm. The bonds are still settling, and washing too soon can loosen the curls.
Avoid tying hair into tight ponytails or buns to prevent denting the curls.
2. Choosing the Right Hair Products For After care
Use a sulfate-free shampoo and conditioner to prevent drying out the curls.
Deep condition once a week to maintain moisture.
Use leave-in conditioners or curl creams to enhance definition.
3. How to Style Permed Hair Tutorial for natural hair
Avoid brushing permed hair with regular brushes (use a wide-tooth comb or your fingers instead).link for comb on amazon affiliate link https://amzn.to/3FRw4nQ
Minimize heat styling (blow dryers, curling irons, flat irons) as excessive heat can weaken curls.
Use a diffuser attachment on a blow dryer if you need to dry hair quickly.
4. Preventing Frizz in natural hair at home

Hydration is key – Dry, dehydrated curls become frizzy.
Consider using silk or satin pillowcases to prevent friction and frizz while sleeping.
Use a lightweight oil or anti-frizz serum to keep curls smooth.
5. How Long Does a Perm Last?
Perms typically last between 2 to 6 months, depending on:
Hair growth rate.
Type of perm.
Hair care routine.
As hair grows, the new roots will be straight, so touch-ups may be needed every few months.
Step-by-Step Guide to Perming Your Hair at home diy tutorial
1. Prepare Your Hair for the Perm Process can you perm hair at home ? YES
Before you begin, it’s crucial to prep your hair to ensure the best results. Clean, dry hair is ideal, but it should be free from styling products like hairspray or mousse. Washing your hair the night before is often recommended, as freshly washed hair can be too clean and may be more sensitive to the chemicals in the perm solution.
Additionally, if you’ve recently used heat tools or have treated your hair with any chemical processes like color or highlights, you should wait a few weeks before perming your hair to avoid over-processing and damage.
2. Choose the Right Perming Solution for Your Hair Type
The type of perm solution you choose depends on your hair’s texture and health. There are two main types of perming solutions:
Alkaline Perm: Best for normal to coarse hair, giving you tighter curls with more body and volume. If you're looking for bold, defined curls like Sharon Stone in Basic Instinct, this solution is perfect for you.
Acid Perm: Ideal for fine or damaged hair, as it creates softer, looser curls while being gentler on your strands. This option is great for a more natural curl, like Sarah Jessica Parker’s famous Sex and the City curls.
Some of the most well-known brands for perm solutions include:
L’Oréal Professional: Known for its high-quality perm solutions, L’Oréal offers products like the L’Oréal Professionnel X-Tenso Moisturist Perm my af link at https://amzn.to/45kkBYe that provide long-lasting results and moisture protection for your hair.
Mizani: A leader in curly hair care, Mizani’s Thermasmooth af link at https://amzn.to/3TpI5nv line offers a gentler perm solution that is perfect for textured or relaxed hair.
Iso Perm: A classic brand in the perm industry, Iso Perm offers a range of alkaline and acid perms, ensuring you get a solution that best matches your hair type.
3. Section Your Hair
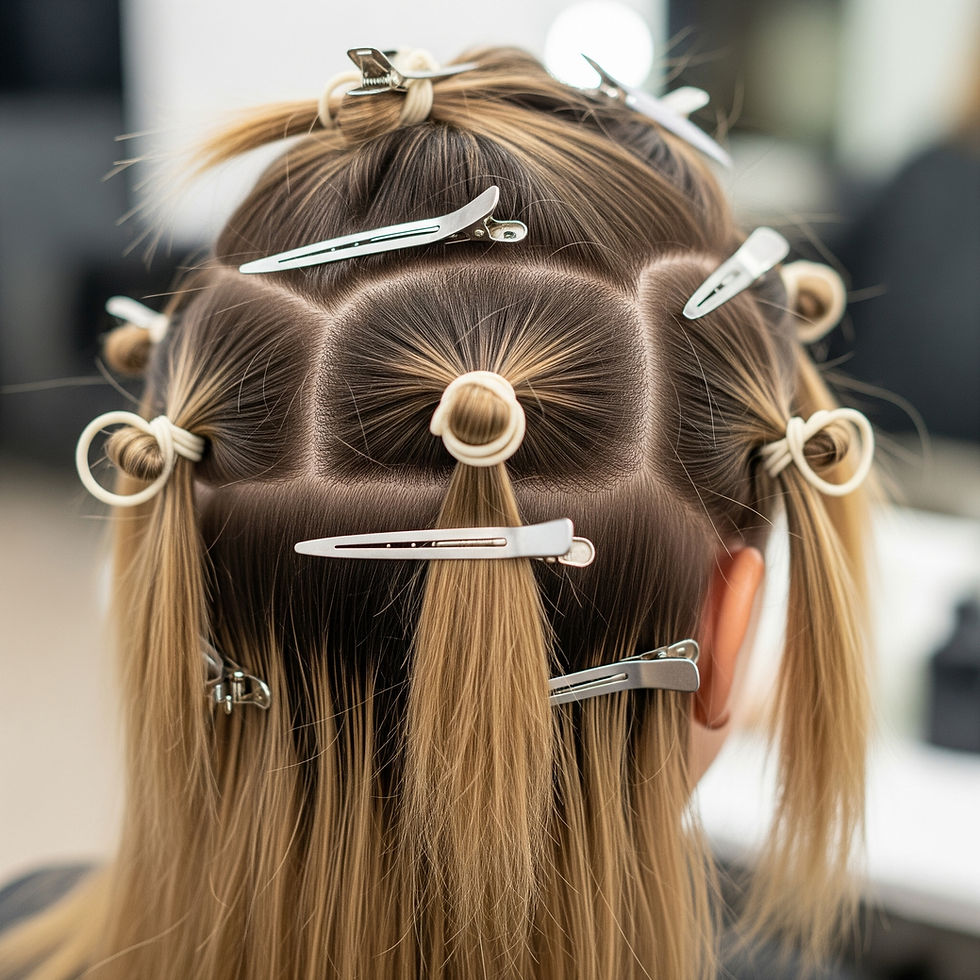
Divide your hair into small sections using clips. This step is vital to ensure that every part of your hair is evenly permed. The smaller the sections, the more defined your curls will be. Celebrities like Julia Roberts, who has rocked voluminous perms, often sport bigger sections of hair to achieve softer waves.
4. Wrap Your Hair on Perm Rods
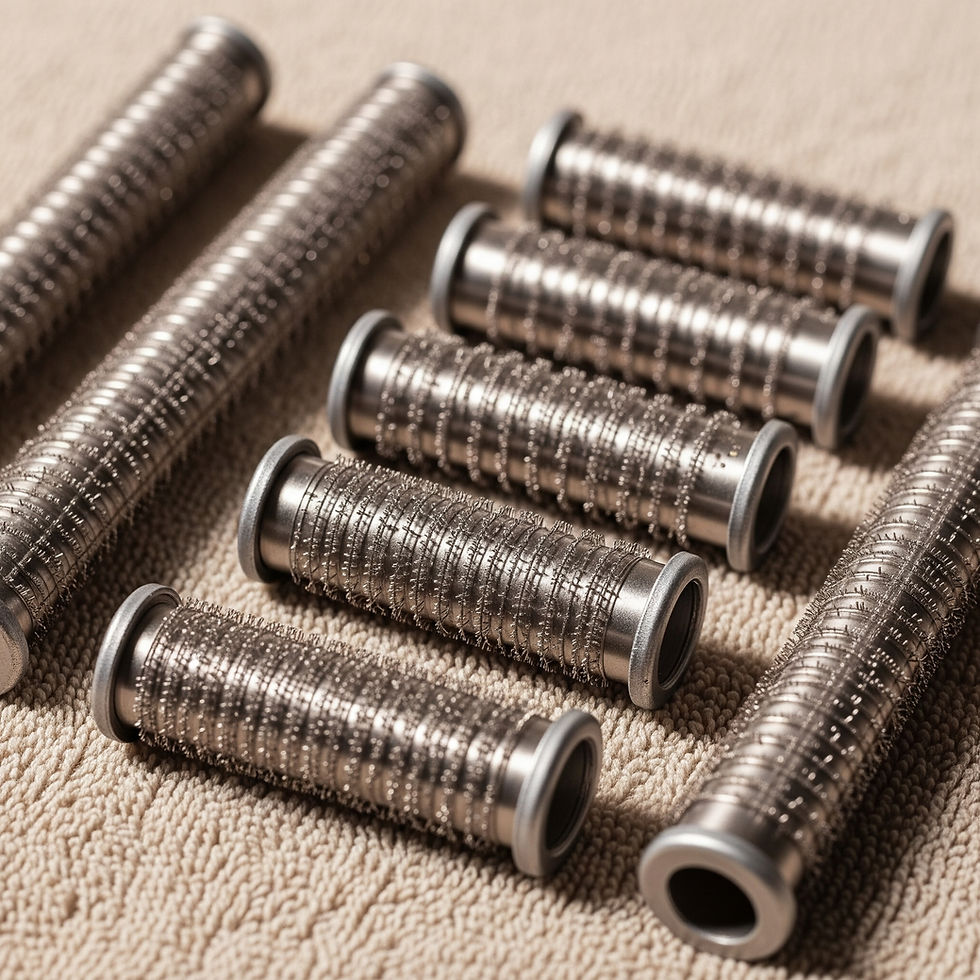
Take a small section of hair and begin wrapping it tightly around a perm rod. Be sure to wrap your hair neatly and evenly to achieve uniform curls. The size of the perm rod will determine the size of your curls—smaller rods for tighter curls, and larger rods for looser waves. Some popular brands of perm rods include:
Conair: Known for their high-quality styling tools, Conair perm rods my af link https://amzn.to/4n14oNQ come in various sizes, making them a great choice for creating everything from tight curls to soft waves.
Olivia Garden: Another brand well-known for its styling tools, Olivia Garden’s perm rods are lightweight and easy to use, ensuring that your hair wraps evenly and my af link https://amzn.to/443K3yM
5. Apply the Perm Solution To Your Hair

Once your hair is wrapped around the rods, it’s time to apply the perm solution. Carefully saturate your hair with the solution, making sure that each section is fully coated. Be mindful of how long you leave the perm solution on, as over-processing can lead to damage.
If you're looking for that Blake Lively beachy wave look, using a gentle perm solution like Mizani’s Thermasmooth can provide a more natural wave, avoiding anything too tight.
6. Rinse and Neutralize Your Hair
After the recommended processing time, rinse your hair thoroughly with warm water, but do not remove the rods yet. Next, apply the neutralizing solution to stop the chemical process. Let the neutralizer sit for the required time, then rinse it out. Some trusted brands for neutralizing solutions are:
Paul Mitchell: Paul Mitchell's The Relaxing System https://amzn.to/43XjtYc a provides effective neutralization, ensuring the curls remain intact after the perm process.
Redken: Known for its high-quality salon-grade products, Redken’s Perm https://amzn.to/3HEWR7d Neutralizer works to lock in curls while restoring balance to your hair’s pH. i have included my af links products amazon
7. Dry and Style your perm at home

Once you’ve removed the perm rods, gently pat your hair dry with a towel. It’s essential to avoid brushing your curls, as this could cause frizz or breakage. Let your hair air-dry, or use a blow dryer with a diffuser for more defined curls. Some brands that help maintain healthy, bouncy curls include:
Moroccanoil: Their Curl Defining Cream is perfect for enhancing natural curls and providing moisture. https://amzn.to/4e4kWk1
DevaCurl: A go-to for curly-haired individuals, Deva Curl’s Ultra Defining Gel helps shape and hold curls without making them crunchy.https://amzn.to/4e4kWk1
Ouidad: Known for curly hair, Ouidad’s Curl Quencher Moisturizing Shampoo https://amzn.to/3FX5b1Iand Curl Styling Gel help nourish and maintain curls post-perm. my af links for amazon
Celebrity Inspiration for Permed Hair at home
Celebrities with iconic perm looks have helped keep this style trendy. Here are a few celebrities known for their gorgeous perms:
Sharon Stone: From her iconic role in Basic Instinct, Stone’s bold and voluminous curls remain a sought-after style. She used the perm to add volume and texture, and it became part of her signature look.
Sarah Jessica Parker: Known for her role as Carrie Bradshaw in Sex and the City, Parker’s natural, bouncy curls have been iconic. She’s embraced perms to create soft, voluminous waves that give her hair an effortlessly chic look.
Julia Roberts: With her wild, voluminous curls, Julia Roberts is one of the biggest celebrity perm inspirations. Her bouncy, natural curls in movies like My Best Friend’s Wedding became a signature part of her image.
Blake Lively: With her textured beach waves, Blake Lively has embraced the "loose perm" look. Her effortless, tousled curls give off a glamorous yet laid-back vibe.
Tips for Maintaining Your Perm at home

Deep Condition Regularly: Permed hair can be drier than natural hair. Use a nourishing deep conditioner once a week to keep your curls hydrated and soft. Brands like Aussie Moist 3 Minute Miracle https://amzn.to/43MlQyi and SheaMoisture offer excellent options for deep conditioning. af link amazon
Avoid Heat Styling: Excessive heat can damage your curls. Stick to air-drying or using a blow dryer with a diffuser on low heat to preserve your perm.
Sleep with a Satin Pillowcase: Reduce friction and prevent frizz by sleeping on a satin or silk pillowcase. Brands like Slip offer luxurious satin pillowcases that help maintain your perm.
Trim Regularly: Keep your curls looking fresh by trimming your hair every 6-8 weeks to remove split ends.
Common Perming Questions
How long does a perm last?A perm typically lasts 2-6 months,

depending on your hair type, how you maintain it, and how fast your hair grows.
Can I perm my hair at home?Yes! With the right tools and perming kit, you can perm your hair at home. However, if you’re new to perming, it’s recommended to consult with a professional stylist for the best results.
What are the risks of perming?Over-processing can lead to dry, damaged, or brittle hair. Always follow instructions carefully and use quality products designed for your hair type.Of course! When styling a perm, it's essential to choose products that enhance curls, provide moisture, and help define the texture without weighing hair down. Below are some of the best products and brands for styling permed hair:
1. Curl Creams & Styling Gels For Your Diy Perm At Home
These products help define curls, control frizz, and provide hold while maintaining softness.
Moroccanoil Curl Defining Cream This cream defines curls and helps them last longer without weighing them down. It contains argan oil for moisture and nourishment, leaving curls smooth and bouncy.
DevaCurl Styling Cream Deva Curl is known for catering to curly hair types. Their styling cream provides definition and hydration while minimizing frizz. It’s a great option for both loose waves and tighter curls.
Ouidad Advanced Climate Control Heat & Humidity If you live in a humid climate, this gel is perfect. It provides curl definition and offers frizz control, even in the most challenging weather conditions.
Aussie Miracle Curls Curl Defining Cream This affordable, drugstore option works great for permed curls. It defines curls and provides moisture, all while keeping the hair soft without crunch.
2. Curl Enhancing Mousse & Foam For Your New Perm
For adding volume and bounce to permed curls, these mousse products are excellent:
Bumble and Bumble Curl Mousse This mousse is perfect for adding volume and definition to your curls. It's lightweight, so it won't weigh your curls down, but it gives a nice bouncy texture that lasts.
John Frieda Frizz Ease Curl Reviver Mousse ideal for creating soft, defined curls, this mousse adds volume while controlling frizz. It’s great for maintaining permed curls without the crunchy feel.
Living Proof Curl Enhancing Styling Mousse This mousse offers a light hold while enhancing the natural curl pattern. It’s formulated to fight frizz and keep curls hydrated without feeling heavy.
3. Leave-In Conditioners & Moisturizers
Permed hair tends to get dry because of the chemical process, so it’s crucial to add moisture and hydration.
Shea Moisture Jamaican Black Castor Oil Leave-In Conditioner A rich, nourishing leave-in conditioner that helps restore moisture to dry, chemically treated hair. It helps detangle, hydrate, and soften curls.
Ouai Curl Leave-In Conditioner This leave-in conditioner helps enhance natural curls, providing hydration and definition. It’s great for preventing frizz and offering heat protection for those who want to style with a blow dryer or diffuse Cantu Shea Butter Leave-In Conditioning Repair Cream Cantu is well-known for its moisture-boosting formulas, and this leave-in conditioner is no exception. It works wonders on permed curls, keeping them hydrated, soft, and frizz-free.4. Curl-Refreshing Sprays
These sprays help revive curls between washes and refresh permed hair when it starts to lose its shape.
Ouidad Curl Last Flexi-Hold Hairspray A flexible, non-crunchy hairspray that holds curls in place while allowing them to move naturally. It works well for keeping curls fresh all day without any stiffness.
Moroccanoil Curl Re-Energizing Spray This spray revitalizes and redefines curls without causing buildup or weighing hair down. It’s great for refreshing permed hair in the morning or between washes.Batiste Dry Shampoo for Curly Hair If your curls start to lose their bounce between washes, this dry shampoo can help refresh and add volume. It’s designed for curly hair and also helps with oil control.
5. Deep Conditioning Masks
To keep permed hair healthy, deep conditioning treatments are essential. They provide moisture, reduce frizz, and restore elasticity to the curls.
Olaplex No. 3 Hair Perfector Known for repairing and strengthening damaged hair, Olaplex is an excellent choice for maintaining the integrity of permed hair. It helps restore bonds broken during the perming process, leaving hair stronger and shinier.
Briogeo Don’t Despair, Repair! Deep Conditioning Mask This mask is packed with nourishing ingredients like rosehip oil, algae extract, and B vitamins to repair and hydrate dry, chemically-treated curls.Redken All Soft Heavy Cream Super Treatment Mask Redken’s mask is great for permed hair that’s feeling dry or brittle. It intensely nourishes, strengthens, and softens curls.
6. Hair Oils & Serums These are the best products for perms

For shine and smoothness, lightweight oils or serums are great finishing touches to keep permed hair looking healthy and frizz-free.
Moroccanoil Treatment A cult favorite for good reason, this oil deeply nourishes and adds shine to curls. It’s light enough not to weigh curls down but rich enough to smooth frizz and add moisture.https://amzn.to/46cWCZH
Bumble and Bumble Hairdresser’s Invisible Oil This lightweight oil helps smooth frizz and adds shine to curly hair. It also provides heat protection if you need to style with heat. https://amzn.to/3VIk0cK
Paul Mitchell Tea Tree Hair and Scalp Oil Perfect for dry, permed hair and scalp, this oil hydrates, soothes, and adds shine. It also has the added benefit of promoting healthy scalp conditions.
7. Diffusers & Hair Tools at babyliss af link below
For blow-drying and styling curls without damaging them, a diffuser is essential for permed hair.
Dyson Supersonic Hair Dryer with Diffuser The Dyson Supersonic is one of the best blow dryers on the market. It comes with a diffuser attachment that gently dries curls while minimizing frizz, leaving curls defined and bouncy.
Conair Infiniti Pro 1875 Watt Tourmaline Ceramic Hair Dryer This affordable blow dryer comes with a diffuser attachment that helps preserve the curl pattern. The ceramic technology reduces frizz while drying curls quickly.https://amzn.to/4jOPOpV
8. Hairsprays for Hold and Frizz Control
After styling, it’s helpful to lock in your curls with a flexible hairspray that prevents frizz without making them crunchy.
L'Oréal Paris Elnett Satin Extra Strong Hold Hairspray A classic hairspray that gives long-lasting hold without stiffening curls. It’s great for setting curls without compromising on softness.
Kenra Volume Spray 25 This is a strong hold hairspray that provides excellent volume and keeps curls in place. It’s perfect for creating long-lasting, frizz-free curls.
Tips for Using Products with Permed Hair at home
Always apply products to damp hair to help distribute them evenly.
Avoid heavy products like thick creams or oils if your hair is on the finer side, as they can weigh curls down.
Try to use sulfate-free shampoos and conditioners to avoid drying out your curls and stripping away moisture.
By using these products and brands, you'll ensure that your perm stays defined, healthy, and vibrant!
Conclusion we hoped you enjoyed our perm tutorial
Perming your hair is a fantastic way to embrace curls or add volume to fine hair. With the right tools, products, and technique, you can achieve beautiful, lasting curls that enhance your look. Plus, with celebrity inspirations like Sarah Jessica Parker, Sharon Stone, and Julia Roberts, you can channel those iconic curly styles. Remember to maintain your hair’s health with proper aftercare and use products from trusted brands like L’Oréal, Mizani, Paul Mitchell, and DevaCurl to keep your curls hydrated, defined, and gorgeous for months to come! how to make perm last longer? How to Make Your Diy Perm Last Longer
Just got a perm? Here's how to keep those curls bouncing for months instead of weeks:
Wait Before You Wash Don't shampoo for at least 2 to 3 days after your perm. I know it's tempting, but your curls need time to fully set. Washing too early can literally rinse your curls down the drain.
Use the Right Products Switch to sulfate-free shampoo and conditioner made for curly hair. Sulfates will strip your curls and make them go limp fast. Also grab a good leave-in conditioner – permed hair gets thirsty.
Skip the Heat Put away the flat iron and curling wand for now. Your hair has been through enough. If you absolutely need heat, use a protectant spray and keep it on low.
Be Gentle Never brush dry permed hair you'll create a frizzy disaster. Only detangle when it's wet with conditioner, using a wide-tooth comb or your fingers.
Dry Smart Ditch the rough towel. Gently squeeze water out with a microfiber towel or old t-shirt, then air dry or use a diffuser on low heat.
Sleep on Silk A silk or satin pillowcase prevents friction that flattens curls overnight. You'll wake up with better-defined curls instead of a messy pile.
What Kills Perms Fast:
Washing too often (stick to 2 to 3 times per week)
Heavy products that weigh curls down
Chlorine and salt water
Tight ponytails that stretch out the curl pattern
Take care of your perm now, and it'll keep looking amazing for 3 to 6 months instead of fading after a few weeks.


